Presented here is a somewhat terse step-by-step guide to installing a working version of FreeCAD 0.19 on macOS Big Sur using Conda.
Additional bonus steps explain how to use the new FreeCAD Extension Manager to install the Assembly4 Workbench and the Render Workbench (with rendering performed by Cycles).
If you use a 3DConnextion SpaceMouse I can report these steps will produce a build which supports it.
The steps below are based on my initial post but updated to support the latest version of FreeCAD 0.19 and Big Sur and to incorporate my further understanding of how this all works. Credit also goes to useful information from DrVAX’s blog post and many contributions on this forum thread.
NOTE 1: These instructions worked using macOS Big Sur 11.2.1 with code repositories and release artifacts available on Feb 15 2021. Your results may vary depending on when you attempt these instructions and what version of macOS is installed …
NOTE 2: I am not sure if this is necessary, but to avoid confusion, before starting, I removed the following items from my system which I had previously installed:
- XCode.app was removed by deleting it from the
/Applicationsfolder. - XCode CommandLineTools was removed by deleting it from the
/Library/Developerfolder. - Brew was removed via
/bin/bash -c "$(curl -fsSL https://raw.githubusercontent.com/Homebrew/install/master/uninstall.sh)"
You do not necessarily need to do the above, but if you are having any issues with the instructions below, maybe try removing some of these if they are already installed…
Also, XCode CommandLineTools is required later, so instructions to install this do appear further below at the appropriate place.
NOTE 3: To avoid confusion, all instructions are executed within the initially created Conda environment so that there should be minimal dependency on pre-installed build tools etc.
Install 3DConnexion drivers
Download and install the beta driver for macOS Big Sur.
Install miniconda
cd /tmp
curl -L -O https://repo.continuum.io/miniconda/Miniconda3-latest-MacOSX-x86_64.sh
bash Miniconda3-latest-MacOSX-x86_64.sh -b
NOTE: Replace <home> below with your home directory e.g. /Users/vectronic or possibly $HOME:
echo ". <home>/miniconda3/etc/profile.d/conda.sh" >> ~/.bash_profile
Close and restart your terminal.
Prepare Conda environment
conda create -n freecad_0_19 -y
conda activate freecad_0_19
From now on, all instructions should be performed within the activated freecad_0_19 environment.
If you open a new terminal to carry on, or whenever you want to run FreeCAD, you will first need to run:
conda activate freecad_0_19
DrVax provides helpful instructions on how the final installed freecad executable can be run as a macOS application.
See “Creating a macOS Application from a Conda Installation” on this page.
Install FreeCAD
conda install -c freecad/label/dev freecad -y
conda install libclang=9.0.1 -y
The libclang command is a workaround for problems launching FreeCAD on Big Sur.
See if it works
Start FreeCAD:
freecad
If FreeCAD starts up (and doesn’t hang), things are looking good…
Exit FreeCAD and go back to the freecad_0_19 Conda environment in the terminal.
Install Xcode command line tools
Trigger the installation with:
xcode-select --install
Follow the instructions and once installed make sure they are in use:
sudo xcode-select -s /Library/Developer/CommandLineTools
Install Extension Manager workbench
mkdir ~/Library/Preferences/FreeCAD/Mod
cd ~/Library/Preferences/FreeCAD/Mod
git clone https://github.com/mnesarco/FreeCAD_ExtMan.git ExtMan
Install cycles standalone
conda install svn cmake -y
cd /tmp
mkdir cycles
cd cycles
mkdir lib
cd lib
svn checkout -r 62553 https://svn.blender.org/svnroot/bf-blender/trunk/lib/darwin
cd ..
git clone git://git.blender.org/cycles.git
cd cycles
Edit src/cmake/Modules/FindOpenImageIO.cmake and change line 70 from TRUE to FALSE e.g.
SET(OPENIMAGEIO_PUGIXML_FOUND FALSE)
Edit src/cmake/external_libs.cmake and change line 235 from PugiXML to PUGIXML e.g.
find_package(PUGIXML REQUIRED)
Then:
PUGIXML_ROOT_DIR=/tmp/cycles/lib/darwin/pugixml make
cp bin-opt/bin/cycles ~/miniconda3/envs/freecad_0_19/bin/
FreeCAD configuration
Start FreeCAD:
freecad
Install Assembly4 using Extension Manager Workbench
- Go to View->Workbench->Extension Manager.
- Select Add (Download) and then Addons.
- Look in the Assembly section for Assembly4 and click Install.
- Confirm Install.
Install Render Workbench using Extension Manager Workbench
- Go back to Add (Download) and then Addons.
- Look in the Uncategorized section for Render and click Install.
- Confirm Install.
Restart FreeCAD.
Configure Render Workbench to use Cycles
- Load the Render workbench: View->Workbench->Render (this might hang for a bit…).
- Configure the render workbench via freecad->Preferences->Render and set:
- Cycles executable path to
cycles - Render parameters to
--samples 500 --background
- Cycles executable path to
Test Part Design model render
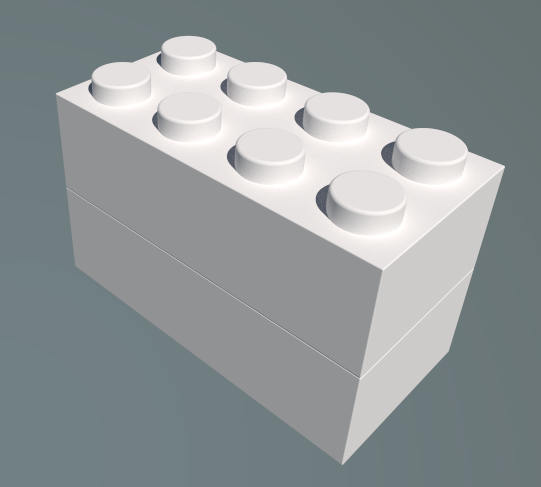
- Download this sample part design model and open it in FreeCAD.
- Create a render project via Render->Cycles Project and selecting the
cycles_sunlight.xmlfile. - Change the Angular Deflection data property of the Cycles Project from
0.52to0.1. - In the tree navigation, select the brick->top_studs_inside_pocket AND the Cycles Project.
- Create a render view via Render->Create View.
- Ensure the view is set to perspective via View->Perspective View.
- Select the Cycles Project in the tree navigation.
- Render via Render->Render (this will hang for a bit… you can see progress in the terminal where you launched FreeCAD).
You should end up with a rendered image similar to this:
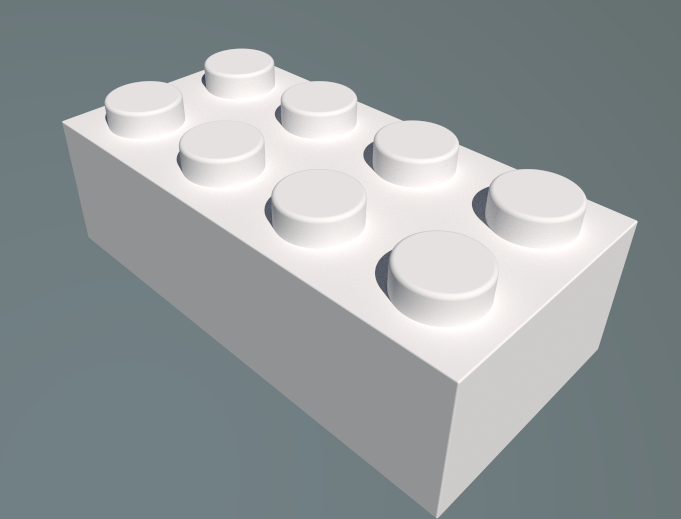
Test Assembly4 model render
- Download this sample assembly4 model and open it in FreeCAD.
- Create a render project via Render->Cycles Project and selecting the
cycles_sunlight.xmlfile. - Change the Angular Deflection data property of the Cycles Project from
0.52to0.1. - In the tree navigation, select the Model AND the Cycles Project.
- Create a render view via Render->Create View.
- Ensure the view is set to perspective via View->Perspective View.
- Select the Cycles Project in the tree navigation.
- Render via Render->Render (this will hang for a bit… you can see progress in the terminal where you launched FreeCAD).
You should end up with a rendered image similar to this: