This website is built using Hugo and deployed on Netlify. I’ve been very happy with both of these technologies since deciding to use them. I did find the Hugo documentation somewhat impenetrable: all the information and detail is there, but it’s a steep ol’ curve for a newcomer. I’ve surmounted that curve and this site now features statically hosted blog comments - including moderation functionality.
This post aims to step through the required config and to point out some salient points.
The general approach is inspired by the following article and accompanying sample project:
- https://css-tricks.com/jamstack-comments/
- https://github.com/philhawksworth/jamstack-comments-engine
The configured system uses Netlify Forms and Functions add-ons. Both of these are free for low volume usage. Comment notification and moderation relies on Slack which is also free.
The source and full configuration instructions are available at:
https://github.com/vectronic/website
Integration Overview
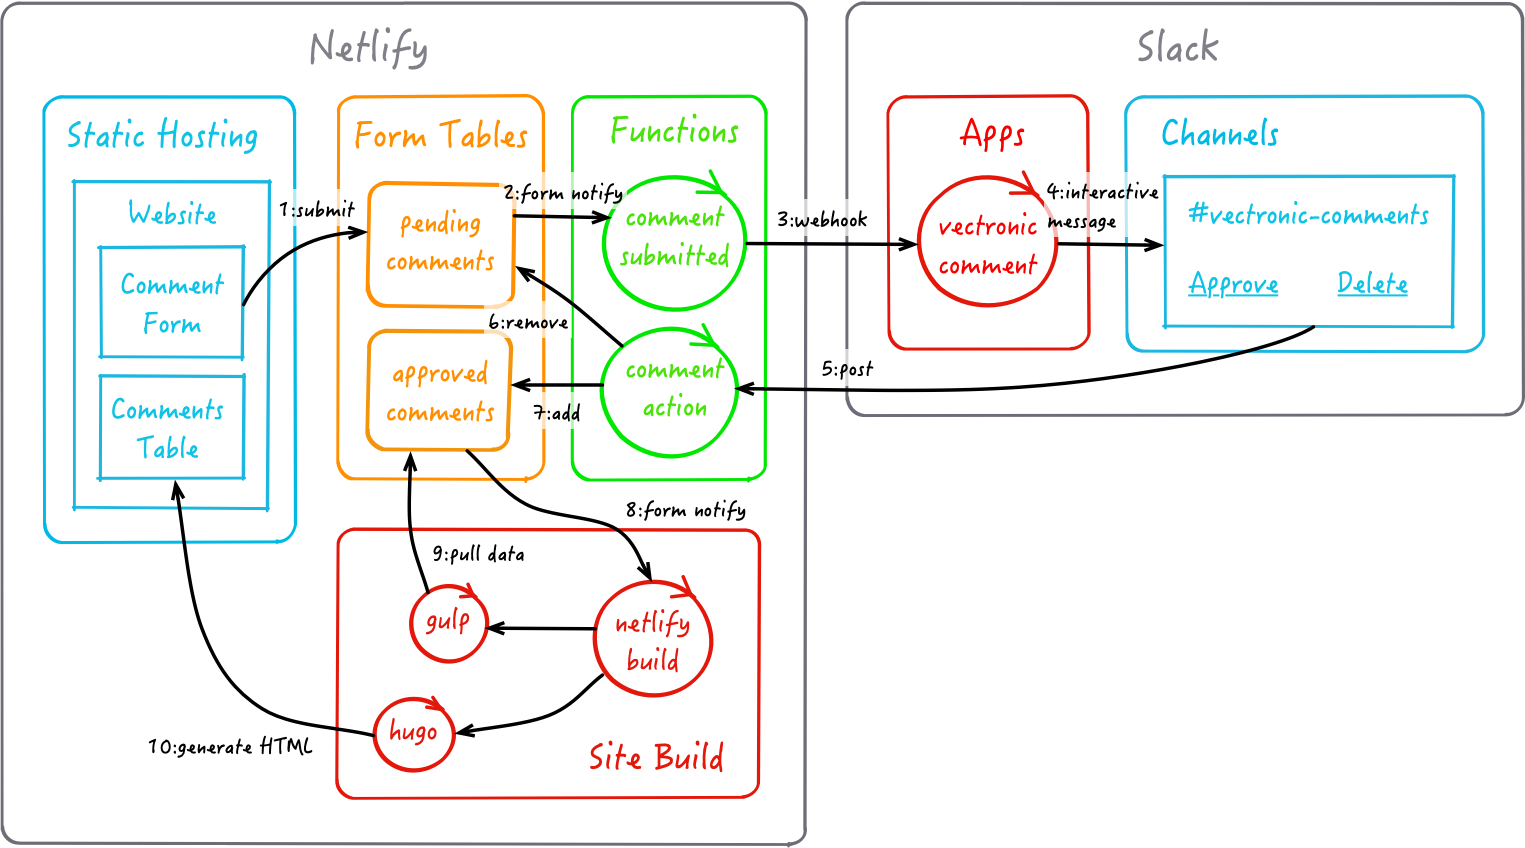
Comment Submission
The following occurs when a user submits a comment via the comment form on a blog post page:
- The form contents are posted to Netlify as the form has a
netlifyattribute and stored in a Netlify table calledpending-comments. - The insertion of a table entry triggers a Netlify Lambda function called
comment-submitted. - The Lambda function posts the comment data via the Slack API to a simple Slack App. My app is called
vectronic-comment. - The Slack App posts the comment to a Slack channel with user actions provided to either “delete”
or “approve” the comment. My channel is called
#vectronic-comment.
Comment Moderation
The following occurs when a user action on a comment is clicked in the #vectronic-comment channel:
- The user action invokes a Netlify Lambda function called
comment-action.- If the action was “delete”, the function calls the Netlify API to delete the entry from the
pending-commentstable. - If the action was “approve”, the function calls the Netlify API to move the entry from the
pending-commentstable to theapproved-commentstable.
- If the action was “delete”, the function calls the Netlify API to delete the entry from the
Approved Comment Publishing
Approved comments are rendered as static HTML as part of the Hugo site build. When a new comment is
added to the approved-comments table the following occurs:
- The insertion of a table entry triggers a Netlify build via a Build Hook.
- The Netlify build runs a Gulp task which:
- Uses the Netlify API to grab all of the approved comments from the
approved-commentstable. - The comments are placed in a map using the blog post as a key and written to a data file.
- Uses the Netlify API to grab all of the approved comments from the
- The Netlify build then runs Hugo which uses the data file as a data source for each of the generated post pages.
Configuration
Presented below is a fairly terse outline of the configuration required in Slack and Netlify.
Slack
-
Configure a Slack App for your workspace. Mine is called
vectronic-comment. -
Add an Incoming Webhook to the app which will post messages to a channel. My channel is called
#vectronic-comment. -
Enable Interactive messages on the app and configure a Request URL for the actions which invokes the Netlify Lambda function called
comment-action. My URL looks like this (the shared secret is discussed further below:https://vectronic.io/.netlify/functions/comment-action?VECTRONIC_FUNCTION_AUTH=<shared secret> -
Install the app in your Slack workspace.
The above should allow posting comment details via the Slack API to a channel in your workspace. The comments will appear as interactive messages with actions to click on. Clicking an action will post back to the configured Netlify Function.
Netlify
One Time Only Table Creation
The Netlify tables that store data submitted from website forms are added to your website configuration upon the initial posting from a form. In our use case both forms
(pending-comments and approved-comments) need to exist before we can do any further configuration:
Pending Comments
For the pending-comments table creation, just submit a test comment using your website comments form. Ensure the HTML
form has a name of pending-comments and the attribute netlify set.
Once a test comment is posted, you should see a pending-comments table in the Netlify admin UI and will be able to configure notifications for it.
Refer to my website source for this here
Approved Comments
Entries in the approved-comments form table are only added via Slack integration calls to the Netlify Lambda function comment-action.
But again, this table needs to be created in Netlify first so that notifications can be configured for it.
The easiest way to achieve this is to temporarily deploy a website page which contains an appropriate HTML form having a name of approved-comments and the attribute netlify set.
Once a test comment is posted, you should see an approved-comments table in the Netlify admin UI and will be able to configure notifications for it.
The approved-comments HTML form can then be commented out or removed from your website source.
Refer to my website source for this here
User Account Level OAuth Token
At the user account level in Netlify, create a new OAuth application personal access token. Mine is called vectronic-comments-management.
This Personal Access Token will be used when making calls to the Netlify API from Netlify Functions.
The Netlify Personal Access Tokens configuration page can be found here.
Build Environment Variables
The following should be defined as environment variables for the Netlify build environment so that sensitive information can be kept out of the website source:
-
NETLIFY_API_AUTH- The personal access token created in the Netlify OAuth applications section. -
NETLIFY_APPROVED_COMMENTS_FORM_ID- The ID of theapproved-commentsform table created in Netlify. The value for this can be ascertained from the Netlify URL seen in the browser when navigating to:Account -> Site -> Forms -> approved-comments. -
SLACK_COMMENT_WEBHOOK_URL- The incoming webhook URL provided for your Slack app when the Incoming Webhook was added to it. -
VECTRONIC_FUNCTION_AUTH- This can be any shared secret key. It is used to prevent access to the publicly exposed Netlify Functions (more on this below).
The above can be set in the “Continuous Deployment” settings section of the Netlify website admin UI.
Build Hooks
Define a Build Hook which will be used to automatically rebuild the site when a new comment is approved. Mine is called build-vectronic.
The above can be set in the “Continuous Deployment” settings section of the Netlify website admin UI.
Form Notifications
Configure the following Outgoing Webhooks:
-
On a new form submission to the
pending-commentsform, post to thecomment-submittedfunction configured in Netlify e.g.https://vectronic.netlify.com/.netlify/functions/comment-submitted?VECTRONIC_FUNCTION_AUTH=
-
On a new form submission to the
approved-commentsform, post to the build hook configured in Netlify.
The above can be set in the Form notification settings section for your Netlify website.
Implementation
Presented below are the salient points of implementation that work in conjunction with the above configuration.
New Comment Form
The source for the website comment form pending-comments can be seen here
Functions
A large part of the action occurs in the implementation of the two Netlify Lambda functions:
- https://github.com/vectronic/website/blob/master/src/functions/comment-submitted.js
- https://github.com/vectronic/website/blob/master/src/functions/comment-action.js
I believe these are fairly self-explanatory. If they’re not, post me a comment!
Approved Comments Gulp Task
The logic to pull approved comments data from the Netlify approved-comments table is implemented in a Gulp task:
https://github.com/vectronic/website/blob/master/gulpfile.js
I believe this is fairly self-explanatory. If not, post me a comment!
Hugo Site Build
Netlify is configured to build the Hugo site via a netlify.toml file as follows:
gulp build:comments && hugo && npx netlify-lambda build src/functions
This build instruction performs three simple steps:
- Pull down the approved comments data into a map structure written to file
- Render the website reading data from the map file
- Build the Lambda functions
Approved Comments Rendering
The source for the website rendering of approved comments can be seen here
Security
The Netlify Lambda functions comment-submitted and comment-action are both available for invocation via public URLs. As I don’t
want anything apart from my website and my Slack account invoking them I have a simple shared secret check implemented:
// check auth
let queryStringParameters = event.queryStringParameters;
if (queryStringParameters["VECTRONIC_FUNCTION_AUTH"] !== process.env.VECTRONIC_FUNCTION_AUTH) {
    return console.log("VECTRONIC_FUNCTION_AUTH query param incorrect");
}
A Quick Note on Scale
I have previously read some criticisms of the approach described here with respect to its ability to scale e.g. many posts requiring many website rebuilds, the time taken to rebuild, the need to moderate each and every comment etc. etc. For me, with currently around 4 posts and 0 comments, its fair to say this isn’t a concern. I will be happy when it does become a concern!
When it does become a concern and I embark on implementing a more scalable solution, I’m happy to know I will have all of my comment data available: both in static rendered form and as raw data available via the Netlify API.